Hexo是一个简洁漂亮的博客框架,用来生成静态网页。本文介绍使用hexo搭建博客。
准备:安装Hexo
安装前提
在安装Hexo之前,应先安装以下应用程序:
安装Git
对Linux(ubuntu,debian)
1 | sudo apt-get install git-core |
安装Node.js
1 | wget -qO- https://raw.github.com/creationix/nvm/v0.33.11/install.sh | sh |
安装完成后,需要重启终端再执行以下命令:
1 | nvm install stable |
安装Hexo
安装好Git和Node.js后,使用npm安装Hexo:
1 | npm install -g hexo-cli |
hexo常用命令
- hexo init
#用于新建一个网站 - hexo new
#在站点根目录下执行,以 /scaffolds/post.md为模板,创建一篇新的文章。新建文章存放在/source/_posts下。 - hexo generate 简写为 hexo g #生成静态网页
- hexo server 简写为 hexo s #启动服务器,默认访问网址为http://localhost:4000/
- hexo clean #用于清楚缓存文件和已经生成的静态文件。当对站点的修改无论如何不能生效时,运行该命令。
- hexo deploy 简写为 hexo d #将生成的静态文件部署到github等远程服务器。
常用的套路是先使用hexo g和hexo s在本地编辑和调试博客,当调试无误后,再用hexo d部署到GitHub。
本地建站
选好路径,以下命令会自动创建文件夹来存放博客内容。
1 | hexo init <folder> #生成hexo模板 |
上述命令生成了以下文件,生成文件夹的目录如下。
1 | . |
上述文件中,只需要重点关注和了解这几个文件:
- _config.yml 是站点配置文件。用来配置博客网站的各种信息。
- /source/_posts 用来存放我们自己之后写的博客。
- themes 用来存放博客的主题。
再执行以下命令:1
2
3cd <folder>
npm install
hexo server
执行完以上命令,可以访问 http://localhost:4000 看到博客已经顺利搭建。
修改站点配置文件
hexo中有两个重要的配置文件,名称都是 _config.yml:
- 站点配置文件,位于站点根目录下,用于站点本身的配置。
- 主题配置文件,位于主题目录下,用于主题相关的配置。
通过修改站点配置文件的下述字段,来分别修改网站名称、副标题、个性签名(或网站简介)、作者和语言设置。
1 | title: |
将博客关联到GitHub
1、在github创建仓库 <your-user-name>.git.io,<your-user-name>必须与你的github用户名相同。
2、编辑站点配置文件,找到字段deploy,作如下的修改。
1 | deploy: |
3、使用命令npm install --save安装插件。
1 | npm install hexo-deployer-git --save |
4、生成静态网页
1 | hexo g |
5、部署到GitHub
1 | hexo d |
运行上述命令后,访问 http://<your-user-name>.git.io
‘hexo d’部署时不输密码
执行hexo d将博客部署到github时,每次都要输入github的账号和密码,非常麻烦。我们利用ssh的公钥登录免去输入密码的步骤。
ssh的公钥登录简介
所谓公钥登录。本地主机生成一个公钥和一个秘钥,把公钥告诉给远程主机(github),而秘钥只有自己知道。当本地主机要登录远程主机时,远程主机(github)发送一个消息序列给本地主机,本地主机用秘钥将消息序列加密后再发送给远程主机;远程主机收到后用公钥解密,若与原消息序列相同,则可以登录。通过这种“公钥登录”的方式保证了安全性,不需要再用账户和密码来验证身份。
本机主机生成公钥和秘钥
在命令行执行:1
ssh-keygen
生成的文件有
id_rsa.pub和id_rsa,分别为公钥和私钥。Linux系统下,生成文件在home/ssh/目录下。windows系统,在C:/user/.ssh下。把公钥告诉给github
在Linux系统下,执行以下命令查看公钥,然后复制。在windows系统下,将id_rsa.pub用文本格式打开来复制。1
2cd ~/.ssh
cat id_rsa.pub在github的
settings>SSH and GPG keys>New SSH keys新建一个ssh key,将复制的公钥粘贴保存即可。修改站点配置文件用ssh方式来访问仓库,而不是用https方式
打开站点配置文件,修改字段deploy下的repository的值。1
2
3
4
5deploy:
type: git
# repository: https://github.com/spring-quan/spring-quan.github.io
repository: git@github.com:spring-quan/spring-quan.github.io.git
branch: master
绑定域名
购买并注册域名
在阿里云的万网购买一个域名。常用的域名后缀有.com/.cn/.me/.top。不同后缀的域名价格不同,可以按照喜好选择一个。
购买好域名后,需要完成 域名实名认证,才能正常进行域名解析,该域名才能使用。
注意:
注册域名后,需要域名实名认证,不需要备案,域名就可以正常使用。
给GitHub添加域名
在博客对应的github仓库下,新建一个文件CNAME,文件名要大写。内容如下,注意要为顶级域名,不能包括www或http。
1 | example.com |
在用hexo d命令将博客部署到GitHub上时,文件CNAME会被覆盖删除掉。为了解决这个问题,还需要在站点目录下/source,新建同样的文件CNAME。
设置域名解析
设置域名解析就是将注册到的域名指向一个IP地址,首先我们要查询github.io域名对应的IP地址。在命令行中ping自己的github.io域名,就可以得到IP地址。
1 | ping <your-user-name>.github.io |
接着,在阿里云万网的管理控制台>域名服务>域名列表中设置域名解析即可。
这时域名就绑定好了,可以通过buptccq.top 和www.buptccq.top 来访问博客。
注意:
1、设置域名解析不是立即生效的,需要等10分钟左右。
2、若用自定义的域名访问失败后,经过修改,避免浏览器的DNS缓存,可以使用浏览器的无痕模式。
写作博客+技巧
在站点根目录下,执行以下命令创建一篇新文章:
1 | hexo new <title> |
上述命令在站点根目录下的\source_posts 文件夹生成一个 .md文件。
按照markdown规则,编辑该文件。接下来介绍编辑md文件的几个技巧。
块引用
1、一种方法。
1 | > 只是块引用 |
效果图如下:
只是块引用
是的啊
markdown语法
绘制表格
用|来分隔不同的单元格,用-来分隔表头和其他行。
关于对齐:
:---左对齐,默认情况:---:居中----:右对齐
使用方式举例:
1 | |主公|刘备|曹操|孙权| |
实现效果:
| 主公 | 刘备 | 曹操 | 孙权 |
|---|---|---|---|
| 政权 | 蜀 | 魏 | 吴 |
| 相关 | 关羽、张飞 | 曹丕、曹植 | 周瑜、鲁肃 |
删除线
使用方式:
1 | ~~删除线~~ |
使用效果为:删除线
markdown其他用法
1 | <!-- more --> #在首页显示摘要 |
文字居左,居中,居右
居中
1 | <center>诶嘿</center> |
居左
1 | <p align="left">诶嘿</p> |
居右
1 | <p align="right">诶嘿</p> |
插入表情
😀😇👹
给博客选用主题
这里要介绍一下“主题”这个概念。主题也就是博客的样式。给博客安装一个好的主题,就好像给人选一件漂亮的衣服穿。hexo有多种不同的主题,可以改hexo选择不同的样式和布局。主题列表有详细的介绍。
使用最多的主题是Next,接下来介绍主题的安装。
安装主题Next
先下载主题Next,在站点根目录下执行:
1
git clone https://github.com/iissnan/hexo-theme-next themes/next
启用主题,打开站点配置文件,找到theme字段,把它的值修改为 next
1
theme: next
验证主题。运行’hexo server’,访问http://localhost:4000。
选择Scheme
通过修改主题配置文件完成。打开主题配置文件,找到字段scheme,将不要的主题注释掉,要用的主题不注释。
1 | #scheme: Muse |
设置语言为中文
通过修改站点配置文件完成。打开站点配置文件,找到字段language,把它值修改为 zh-Hans
1 | language: zh-Hans |
主题美化-1
设置上部的菜单栏
设置菜单内容。通过修改主题配置文件完成。打开主题配置文件,找到字段menu,不用的菜单栏选项注释掉,要用的不注释。
1
2
3
4
5
6
7menu:
home: /
archives: /archives # 冒号右边为主题目录下/source下的文件夹。
#about: /about
#categories: /categories
tags: /tags
#commonweal: /404.html设置菜单项的显示文本。编辑主题目录下的/languages/zh-Hans.yml。
1
2
3
4
5
6
7
8menu:
home: 首页
archives: 归档
categories: 分类
tags: 标签
about: 关于
search: 搜索
commonweal: 公益404设置菜单项的图标。编辑主题配置文件,找到字段menu_icons,修改为:
1
2menu_icons:
enable: true
设置头像
打开主题配置文件,找到字段avatar,把它的值修改为头像照片的路径。将头像照片放在主题目录/source/images(如果不存在就创建)。
1 | avatar: /images/avatar.png |
添加‘标签’页面
首先要在菜单栏显示‘标签’链接。在站点目录下,新建一个页面:
1 | hexo new page tags |
编辑刚刚生成的页面,修改字段 title 和 type
1 | title: 标签 |
在菜单栏中添加链接。修改主题配置文件,找到字段menu下的字段tags,把它值修改为 /tags
1 | menu: |
添加‘分类’页面
与添加‘标签’页面基本相同。
首先要在菜单栏显示‘分类’链接。在站点目录下,新建一个页面:
1 | hexo new page categories |
编辑刚刚生成的页面,修改字段 title 和 type
1 | title: 分类 |
在菜单栏中添加链接。修改主题配置文件,找到字段menu下的字段tags,把它值修改为 /tags
1 | menu: |
新建一个友链页面
在菜单栏中添加链接和链接图标。编辑
站点配置文件,找到字段menu,添加以下内容:1
2menu:
links: /links/ || link # ||左边代表文件夹/source/links,右边代表图标修改链接的显示文本,编辑文件
/themes/next/languages/zh-Hans.yml,找到字段menu。1
2menu:
links: 友链在站点目录下执行以下命令,会生成
/source/links/index.md文件。通过编辑该文件可以控制友链页面的显示内容。1
hexo new page links
关闭’标签’、’分类’页的评论
分别编辑站点目录下的/source/tags/index.md和/source/categories/index.md,添加字段comments,把它的值修改为false。
1 | comments: false |
侧边栏添加社交链接
通过修改主题配置文件完成。打开 主题配置文件 ,修改两个部分,链接和链接图标。
1、添加链接。找到字段 social ,一行为一个链接。格式为 显示文本:链接
1 | # Social links |
2、修改链接图标。找到字段 social_icons 。键值对格式为 匹配键:图标名称 。在图标库找到合适的图标,将名字作为图标名称。
1 | # Social Icons |
侧边栏添加友情链接
打开 主题配置文件 ,找到字段 links 。键值对格式为 显示文本:链接
1 | # Blog rolls |
开启打赏功能
通过修改主题配置文件完成。打开 主题配置文件 ,找到以下字段。将收款二维码放到站点目录下的/source/images/(没有该文件夹,就新建)中。
1 | reward_comment: 坚持原创技术分享,您的支持将鼓励我继续创作! |
修改打赏字体不闪动
修改文件MyBlog/themes/next/source/css/_common/components/post/post-reward.styl,注释文字闪动的函数。
1 | /*注释文字闪动的函数 |
订阅微信公众号
在每篇文章的末尾显示微信公众号。把微信公众号二维码放在MyBlog/themes/next/source/images/下。
编辑 主题配置文件 ,找到字段wechat_subscriber,修改它的值。
1 | # Wechat Subscriber |
设置腾讯公益404界面
1、在目录MyBlog/themes/next/source/下新建404.html页面,内容如下:
1 | <!DOCTYPE HTML> |
2、修改 主题配置文件 ,找到字段 menu 下的字段 commonweal,把它值修改为 /404.html
1 | menu: |
设置背景动画
编辑 主题配置文件。以下四个字段为不同的背景动画效果,要想启用,将false改为true。
1 | # Canvas-nest |
添加评论系统
‘网易云跟帖’评论已经不提供服务。我们采用’来必力’评论系统时,需要获取uid。
1、先在来必力的官方网站注册账号,在>安装下安装city版本,再在>管理页面>代码管理下获取uid。data-uid字段的值就是我们需要的uid。
2、编辑 主题配置文件 ,找到字段’livere_uid’,把它的值改为data-uid字段的值。
1 | livere_uid: #your uid |
添加搜索功能
通过Local Search搜索服务实现搜索功能。
1、安装插件hexo-generator-searchdb,在站点的根目录下执行
1 | npm install hexo-generator-searchdb --save |
2、编辑 站点配置文件,在文末新增以下内容:
1 | search: |
3、编辑主题配置文件,找到字段”local_search”,修改值为true。
1 | local_search: |
主题美化-2
设置【阅读全文】
在首页只显示文章的部分内容,通过按钮【阅读全文】来实现跳转。有三种方式可以实现该功能,这里介绍最方便的一种。
在文章中使用<!-- more -->来进行截断,<!-- more -->之前的内容显示在首页,后面的内容不显示。
1 | <!-- more --> |
分页-设置页面文章的篇数
为网站首页、归档页和标签页设置不同的文章篇数。
1、使用npm install --save安装插件。
1 | npm install --save hexo-generator-index |
2、编辑站点配置文件,找到以下字段并修改。
1 | index_generator: |
设置网站的图标
在EasyIcon中找一张中意的图标。修改图标名称为favicon.ico,将图标放在路径/next/source/images/下。编辑主题配置文件,找到字段favicon,修改它的值。
1 | favicon: |
添加顶部的加载条
修改主题配置文件,找到字段pace,把值设为true。还可以选择不同风格的加载条。
1 | pace: true |
修改文章底部的标签#为
修改文件 /themes/next/layout/_macro/post.swig,搜索rel="tags">#,将#换成<i class="fa fa-tag"></i>。
也可以在图标库找自己中意的图标。
修改网页底部的桃心
编辑/themes/next/layout/_partials/footer.swig,找到以下代码,将第二个class的值并修改为"fa fa-heart",在图标库找自己中意的图标。
1 | <span class="with-love"> |
实现统计功能
使用npm install --save安装插件
1 | npm install hexo-wordcount --save |
网站底部字数统计
编辑/themes/next/layout/_partials/footer.swig,在文末添加以下代码:
1 | <div class="theme-info"> |
文章字数和阅读时长
编辑主题配置文件,找到字段post_wordcount,并修改。
1 | post_wordcount: |
统计访问量和阅读量
我们用busuanzi实现统计功能。
1、全局配置。编辑主题配置文件,找到字段busuanzi_count,将enable的值改为true。
2、编辑字段site_uv,统计本站访客数。
3、编辑字段site_pv,统计本站总访问量。
4、编辑字段page_pv,统计每篇文章的阅读量。
1 | busuanzi_count: |
问题:busuanzi统计不显示数字(2019.1.15)。
原因是buxuanzi的域名变更,由<dn-lbstatics.qbox.me>变为<busuanzi.ibruce.info>,导致统计功能不能实现。解决方案如下:
编辑文件
themes\next\layout\_third-party\analytics\busuanzi-counter.swig,找到以下代码1
<script async src="https://dn-lbstatics.qbox.me/busuanzi/2.3/busuanzi.pure.mini.js"></script>
将其修改为:
1
<script async src="https://busuanzi.ibruce.info/busuanzi/2.3/busuanzi.pure.mini.js"></script>
重新推送后,可以看到统计功能正常。
实现点击出现桃心
1、在路径/theme/next/source/js/src/下新建 love.js
2、编辑文件/theme/next/layout/_layout.swig文件,在文末添加代码:
1 | <!-- 页面点击小红心 --> |
修改链接文本样式
修改文件themes\next\source\css\_common\components\post\post.styl,在文末添加如下代码。关于颜色的代码见详情
1 | // 文章内链接文本样式 |
置顶某篇文章
修改文件MyBlog/node_modules/hexo-generator-index/lib/generator.js,将全部代码替换为
1 | 'use strict'; |
在文章front-matter中添加字段top,该字段的数值越大文章越靠前。
1 | title: 第三篇 |
文章加密访问
编辑文件MyBlog/themes/next/layout/_partials/head.swig,在第五行插入以下代码:
1 | <script> |
在文章front-matter中添加字段password,该字段的值不为空则文章加密,若字段的值为空则文章没有加密。
1 | title: 第三篇 |
自定义新建文章的md文件
修改/scaffolds/post.md文件为:
1 | --- |
显示浏览进度
编辑主题配置文件,修改字段scrollpercent的值为true
1 | # Scroll percent label in b2t button. |
使得HEXO的next主题渲染LATEX数学公式
编辑主题配置文件,修改字段mathjax的值为true
1 | # MathJax Support |
主题美化-3
修改代码块自定义样式
编辑\themes\next\source\css\_custom\custom.styl,在文末添加如下代码。关于颜色的代码见详情
1 | // Custom styles. |
设置代码高亮主题
Next使用 Tomorrow Theme作为代码高亮。有五个主题可供选择。
1.编辑 主题配置文件,找到字段highlight_theme,修改它的值。
1 | # Code Highlight theme |
- 实现代码变成彩色。修改站点配置文件,找到字段
highlight下的字段auto_detect的值为true1
2
3
4highlight:
enable: true
line_number: true
auto_detect: true
添加代码块复制功能
通过第三方插件clipboard.js来实现复制功能。
1.目录/themes/next/source/js/src下新建两个 .js文件。
clipboard.min.js。下载第三方插件clipboard.min.jsclipboard-use.js,文件内容如下:
1 | /*页面载入完成后,创建复制按钮*/ |
2.在文件\themes\next\source\css\_custom\custom.styl文末添加代码:
1 | //代码块复制按钮 |
3.在.\themes\next\layout\_layout.swig文末添加代码:
1 | <!-- 代码块复制功能 --> |
文章摘要图片
让图片出现在网站首页的文章摘要中,但不出现在文章的正文中。
编辑
主题配置文件,修改字段expert_description的值为false1
2
3
4excerpt_description: false
auto_excerpt:
enable: false编辑文件
themes/next/layout/_macro/post.swig,找到代码:1
2{\% elif post.excerpt %\}
{{ post.excerpt }}
在它后面添加如下代码:
1 | {\% if post.image %\} |
- 编辑文件
/themes/next/source/css/_custom/custom.styl,在文末添加如下代码:1
2
3
4// 自定义的文章摘要图片样式
img.img-topic {
width: 100%;
}
使用方式是,在文章的.md文件的front-matter加上一行image: path/to/image:
1 | title: {{ title }} |
设置背景图片
方法一
通过jquery-backstretch,编辑文件/themes/next/layout/_layout.swig,在最后的</body>之前添加
1 | <script src="https://cdnjs.cloudflare.com/ajax/libs/jquery-backstretch/2.0.4/jquery.backstretch.min.js"></script> |
方法二
编辑文件/themes/next/source/css/_custom/custom.styl,添加代码:
1 | // Custom styles. |
搜索引擎优化(SEO)-提高网站排名
我们搭建好博客之后,在搜索引擎(百度、Google)中搜索博客,会发现根本搜索不到。这是因为我们的博客网站没有没搜索引擎收录,也就搜索不到。因此我们需要进行搜索引擎优化。搜索引擎优化是为提高我们的博客在搜索结果中的排名,来增大网站的流量。通俗地说,就是让我们的博客更容易被搜索到。
- 让搜索引擎收录我们的网站。
- 提高网站在搜索结果中的排名。
hexo优化准备
编辑配置文件
站点配置文件
站点配置文件中的这四项一定要写
1 | title: |
打开Next主题自带的SEO配置
编辑主题配置文件,找到这四个字段,并设置为true。
1 | canonical: true |
设置关键字
- 设置博客的关键字。编辑
站点配置文件,添加字段keywords,值用逗号隔开。 - 设置文章的关键字。在文章中,添加字段
keywords,值用逗号隔开。1
keywords: word1,word2,word3
网站首页title优化
我们知道读文章时,标题和摘要往往比段落中的大段文字重要。同样在搜索引擎爬取收录网页时,title起到更重要的作用。
关键词出现在网站title中,可以提高网站被搜索到的可能。网站的title一般不超过80字符。
我们把网站首页的title改为网站名称-关键词-网站描述的形式。
编辑文件\themes\next\layout\index.swig,将以下代码
1 | {\% block title %\}{{ config.title }}{\% if theme.index_with_subtitle and config.subtitle %\} - {{config.subtitle }}{\% endif %\}{\% endblock %\} |
修改为,可以看到通过插入和来添加关键词和网站描述。
1 | {\% block title %\}{{ config.title }} - {{ config.keywords }} - {{ theme.description }}{\% if theme.index_with_subtitle and config.subtitle %\} - {{config.subtitle }}{\% endif %\}{\% endblock %\} |
网站名称、关键词、网站描述的显示文本分别对应站点配置文件中的字段title,keywords和description的值。
1 | title: spring'Blog #网站标题 |
给所有外部链接添加nofollow标签
使用
npm install --save安装插件hexo-autonofollow1
npm install hexo-autonofollow --save
编辑站点配置文件,在文末添加如下代码。不想添加的链接写在字段
exclude后。1
2
3
4
5nofollow:
enable: true
exclude:
- exclude1.com
- exclude2.com
提交链接和验证网站
这一步是让搜索引擎收录我们的网站。我们需要在搜索引擎提交我们的链接,提交链接时需要验证这个网址是我们的,不是别人的。以下为搜索引擎的网站管理工具
搜索引擎给出了网站验证的多种方式,百度和谷歌进行网站验证的原理和步骤差不多。这里介绍两种验证方式:html文件验证和CNAME验证
html文件验证
下载验证文件
.html,放到站点目录/source下。hexo会自动对HTML文件进行渲染,但我们不希望验证文件被渲染,需要做一些配置。修改站点配置文件,编辑字段
skip_render的值为 验证文件名.html。该字段后可以有多个值,以逗号分隔。该字段后的文件名会跳过渲染。1
skip_render: google6af533d85b9bfd8c.html,baidu_verify_mreXNGCYRV.html
清除缓存并将修改同步到github.
1
2hexo clean
hexo g -d点击完成验证。
CNAME验证
- CNAME验证是设置域名解析。需要登录阿里云万网。
- 选择
控制台>产品与服务>域名,管理域名的解析。添加CNAME类型的解析。
站点地图sitemap和爬虫协议robot.txt
站点地图是一个文件。告诉Google和百度应该抓取哪些网页。robot.txt也是一个文件。告诉Google和百度不应该抓取哪些网页。
站点地图sitemap
先添加站点地图文件,再提交给Google和百度。告诉Google和百度应该抓取哪些网页。
使用命令安装自动生成站点地图sitemap的插件。
1
2npm install hexo-generator-sitemap --save
npm install hexo-generator-baidu-sitemap --save编辑
站点配置文件,在文末添加以下代码:1
2
3
4sitemap:
path: sitemap.xml
baidusitemap:
path: baidusitemap.xml执行命令,会在站点目录下的
public文件夹生成站点地图文件sitemap.xml和baidusitemap.xml文件,前者提交给Google,后者提交给百度。1
hexo g
把站点地图文件提交给Google和百度。
- 在Google的旧版Search Console提交站点地图文件
https://buptccq.top/sitemap.xml(修改为你自己的域名)。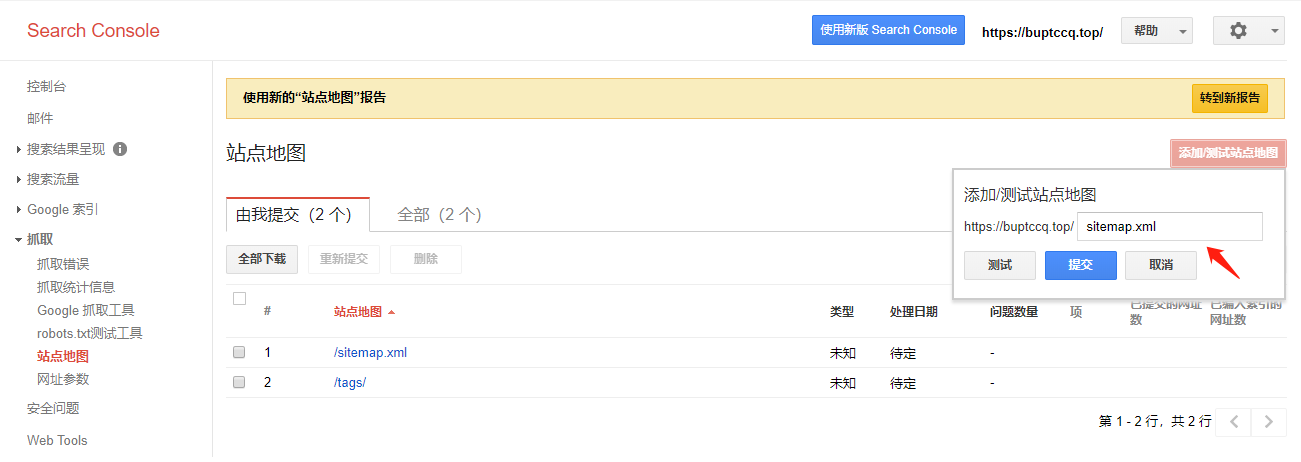
- 在百度的网站管理工具提交站点地图文件
https://buptccq.top/baidusitemap.xml(修改为你自己的域名)。
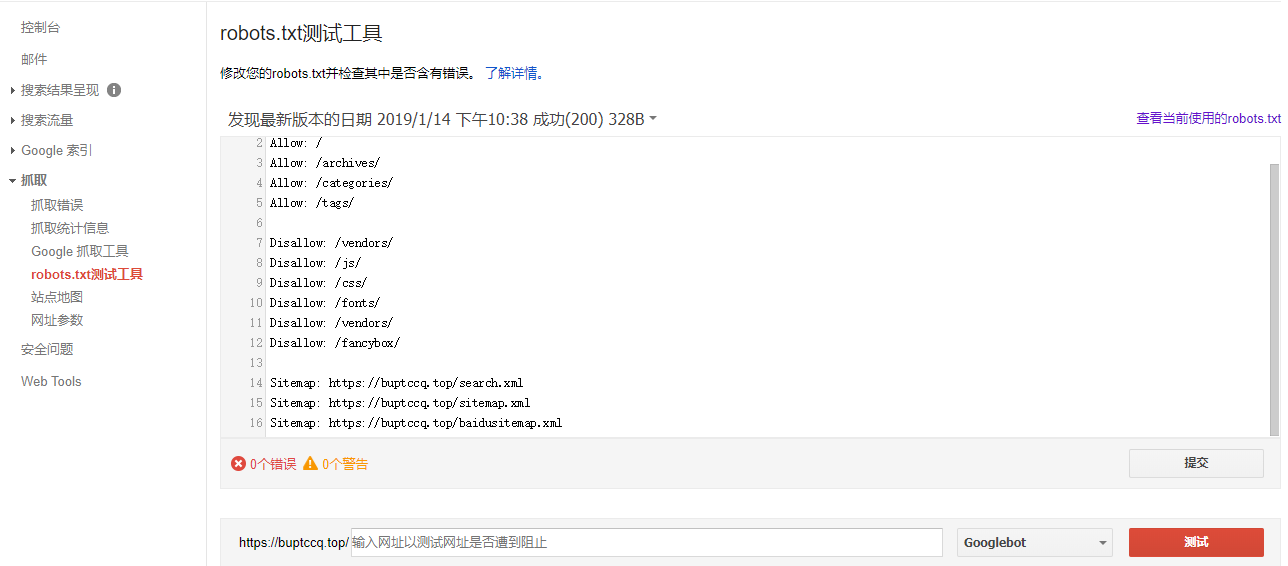
爬虫协议robot.txt,又成蜘蛛协议
添加爬虫协议文件robot.txt,再提交给Google和百度。告诉Google和百度不要抓取哪些网页。
在站点目录
source下新建文件robot.txt。内容如下,注意修改为自己的域名。1
2
3
4
5
6
7
8
9
10
11
12
13
14
15
16#hexo robots.txt
User-agent: *
Allow: /
Allow: /archives/
Disallow: /vendors/
Disallow: /js/
Disallow: /css/
Disallow: /fonts/
Disallow: /vendors/
Disallow: /fancybox/
Sitemap: http://blog.tangxiaozhu.com/search.xml #注意修改为你自己的域名
Sitemap: http://blog.tangxiaozhu.com/sitemap.xml
Sitemap: http://blog.tangxiaozhu.com/baidusitemap.xml执行命令
hexo d -g部署到github上。1
hexo d -g
再把爬虫协议文件提交给Google和百度。
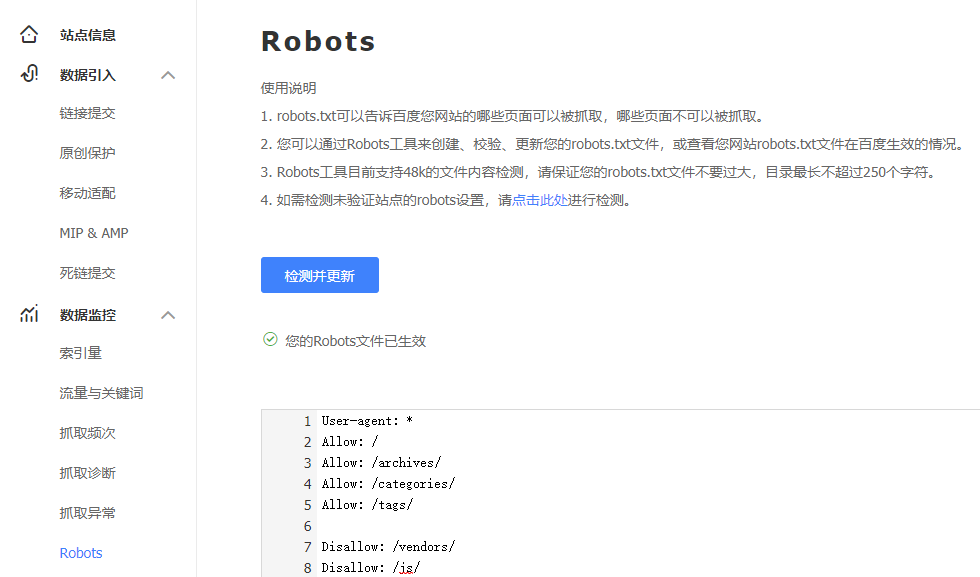
- Google的旧版Search Console。
- 百度的网站管理工具。
谷歌收录和百度收录
查看网站是否被收录
在百度或Google浏览器中,以site:<your url>形式搜索你的博客。如果能搜到,就是被收录了。搜不到就是没有收录。
谷歌收录
百度收录
我们在前面已经把博客首页的网址收录到百度搜索引擎了,但当我们写出新的博客,产生新的链接后,需要把这些新的链接收录到百度。这里介绍两种实现自动收录的方式:主动推送和自动推送
主动推送
主动推送将新产生的链接立即推送给百度搜索引擎,从而保证新链接被尽早收录。
使用命令
npm install --save安装自动百度推送插件。1
npm install hexo-baidu-url-submit --save
编辑站点配置文件,在文末添加以下代码:
1
2
3
4
5baidu_url_submit:
count: 3 ## 比如3, 代表提交最新的三个链接
host: <www.henvyluk.com> ## 在百度站长平台中注册的域名
token: <your_token> ## 请注意这是您的秘钥, 请不要发布在公众仓库里!
path: baidu_urls.txt ## 文本文档的地址, 新链接会保存在此文本文档里其中
<your_token>可以在百度网址管理工具中找到: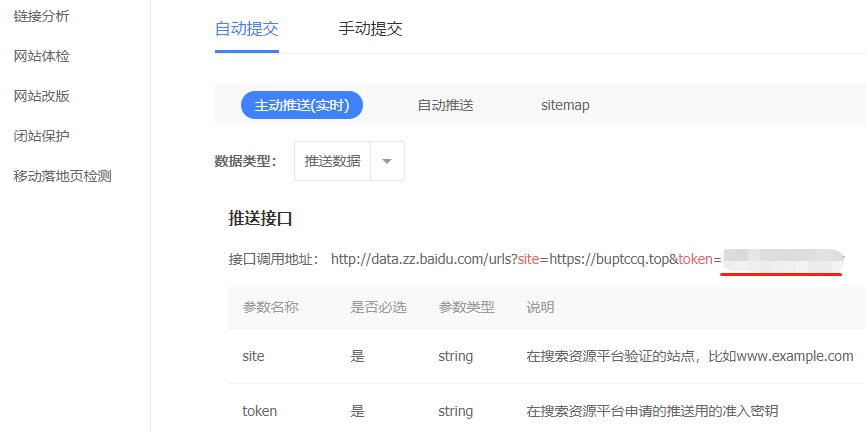
需要注意的是,编辑站点配置文件,确保字段
url的值为你的域名。1
2
3# URL
## If your site is put in a subdirectory, set url as 'http://yoursite.com/child' and root as '/child/'
url: https://buptccq.top #http://yoursite.com编辑站点配置文件,找到字段
deploy,添加一个新的deploy类型-type: baidu_url_submitter。不同的deploy类型用-type表示。1
2
3
4
5
6deploy:
- type: baidu_url_submitter
- type: git
# repository: https://github.com/spring-quan/spring-quan.github.io
repository: git@github.com:spring-quan/spring-quan.github.io.git
branch: master
主动推送的原理如下:
- 产生新链接。
hexo g会生成文本文件baidu_urls.txt,里面包含最新的链接。 - 推送新链接。
hexo d会从文本文件baidu_urls.txt中读取新链接,再推送给百度。
自动推送
编辑主题配置文件,修改字段baidu_push的值为true。
1 | # Enable baidu push so that the blog will push the url to baidu automatically which is very helpful for SEO |
##踩过的坑
“hexo server”本地启动时,报错如下:
1
Unhandled rejection Error: ENOENT: no such file or directory, open '/MyBlog/themes/next/layout/_scripts/schemes/.swig'
错误原因处在主题配置文件
_config.yml存在不规范的内容。要仔细检查,规范化内容就行。修改过来之后,要先执行hexo clean,再hexo server就可以了。